एमएस वर्ड में पैराग्राफ किसी Text ,Graphics या line को कहते हैं जो एक Paragraph Symbol (¶) के साथ समाप्त होता है. कंप्यूटर प्रत्येक Enter Key के Press करने पर एक पैराग्राफ समाप्त होना समझा जाता है एवं एक Paragraph Symbol (¶)प्रदर्शित करता है.
A paragraph in MS Word is a text, graphics or line that ends with a paragraph symbol (¶). The computer is considered to end a paragraph on each press of the Enter key and displays a Paragraph Symbol (¶).
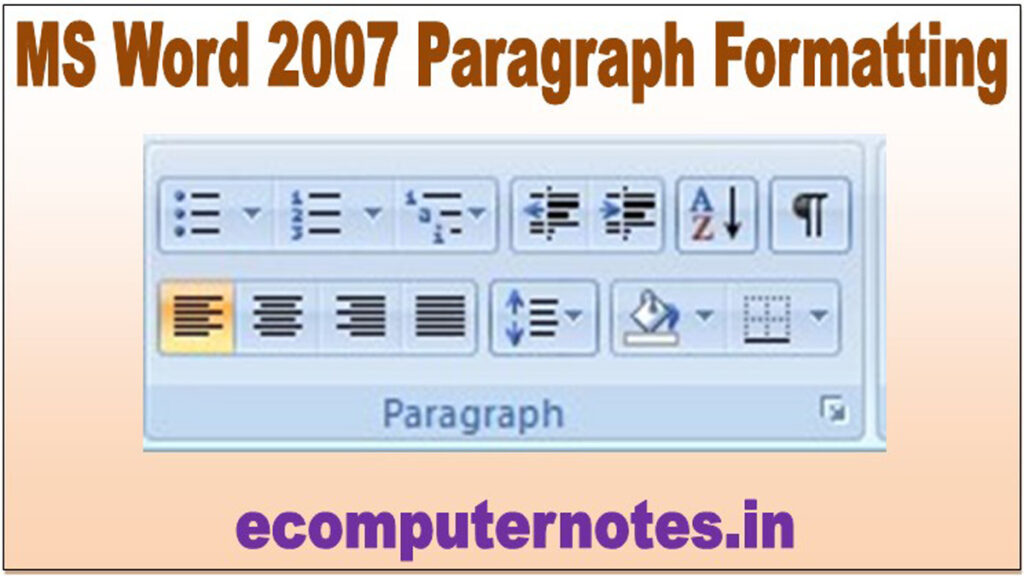
MS Word 2007 Paragraph Formatting एमएस वर्ड 2007 पैराग्राफ फार्मेटिंग
MS Word 2007 Paragraph Formatting – एमएस वर्ड में पैराग्राफ किसी Text ,Graphics या line को कहते हैं जो एक Paragraph Symbol (¶) के साथ समाप्त होता है कंप्यूटर प्रत्येक Enter Key के Press करने पर एक पैराग्राफ समाप्त होना समझा जाता है एवं एक Paragraph Symbol (¶) प्रदर्शित करता है पैराग्राफ में Bullets, Numbring, Multilevel list, Alignment, Line Spacing, Shading, Border जोड़कर Paragraph को Effective बना सकते हैं एमएस वर्ड में Paragraph को Formate करने के लिए Home Tab के Paragraph Group का उपयोग किया जाता है.
In MS Word, a paragraph is a text, graphics or line that ends with a paragraph symbol (¶). You can make the paragraph effective by adding Bullets, Numbering, Multilevel list, Alignment, Line Spacing, Shading, Border to the paragraph. The Paragraph Group of the Home Tab is used to format the paragraph in MS Word.
MS Word 2007 Bullets and Numbering
एमएस वर्ड में Bullets Point एवं Numbering का उपयोग list बनाने के लिए किया जाता है साथ ही Paragraph एवं Heading मे Bullets Point एवं Numbering का उपयोग करके हम अपने डॉक्यूमेंट को Effective बना सकते हैं.
Bullets Point and Numbering are used in MS Word to make a list, as well as by using Bullets Point and Numbering in Paragraph and Heading, we can make our document effective.
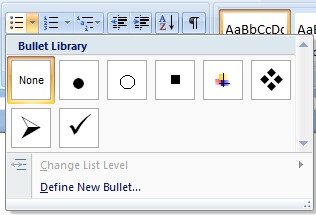
Ms word मे Bullets Point Symbol जैसे Dot और Small Square होता है जिसका उपयोग करके अपने डॉक्यूमेंट में Text के पहले देकर Emphasis (महत्त्व) को बढ़ा सकते हैं साथ ही Text को पढ़ने Text की स्पष्टता को और अधिक Atractive बना सकते हैं-
Ms word contains Bullets Point Symbol like Dot and Small Square, using which you can increase the emphasis (importance) by giving it before the text in your document as well as make the clarity of the text more attractive to read.
Apply Bullets in paragraph follow this steps
Place the cursor where you want to create the bullet Point, or select the text
you want to apply the list to
Step 1 कर्सर को वहां पर रखें जहां लिस्ट क्रिएट करना चाहते हैं या टेक्स्ट का चयन करें
Click on the bullet button on paragraph group on home tab.
Step 2 होमटैब के पैराग्राफ ग्रुप पर बुलेट ऑप्शन पर क्लिक करें.
You can add additional bullet points to the list by pressing enter
Step 3 आप एंटर दबाकर सूची में बुलेट पॉइंट जोड़ सकते हैं.
Clicking the bullets button again will end the bulleted list – you can also press enter twice after the last bullet to end the list.
Step 4 बुलेट बटन को फिर से क्लिक करने से बुलेटेड सूची समाप्त हो जाएगी – सूची को समाप्त करने के लिए आप अंतिम बुलेट के बाद दो बार एंटर दबा सकते हैं.
Clicking the bullet button again will end the bulleted list – you can press Enter twice after the last bullet to end the list.
Change Bullet Symbol
Creating Number list
- Click the down arrow to the right of the bullets button.
- Select and click a bullet style from the menu
- You can define your own bullets using symbols, pictures and fonts by clicking define new bullet.
- Click where you want the list to start or select the text you want to apply the list to
- Click the Numbering button in the paragraph group on the home tab of the ribbon.
Changing number format
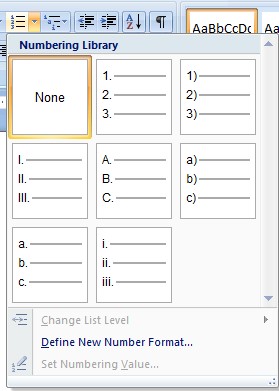
- Click the down arrow to the right of the numbers button
- Select and click a bullet style from the options shown on the menu
- You can define bespoke bullets using symbols, pictures and fonts by clicking the define new
- number format option.
Creating a multilevel list
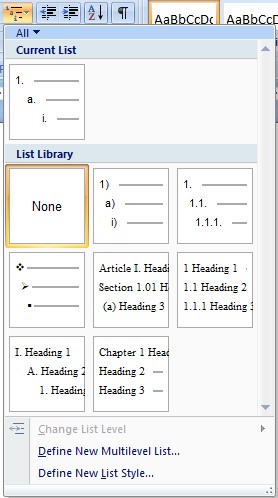
To apply a multilevel list to a paragraph:
- Click where you want the list to start or select the text you want to apply the list to
- Click the multilevel list button which is located in the paragraph group on the home tab of the ribbon
- Choose one of the layouts from the List Library
- Click the increase or decrease indent buttons located in the paragraph group to change the list
- level or press the tab or shift tab keys
Alignment
पैराग्राफ में टेक्स्ट स्वतः बायीं ओर रहता है आवश्यकतानुसार उसे दायी ओर, केंद्रीय एवं दोनों ओर से बराबर (जस्टिफाई) कर सकते हैं विभिन्न तरह से मिलान करने के लिए निम्नलिखित आईकनो का प्रयोग करें
Microsoft Word defaults to left justified (aligned) paragraphs. This means that new lines automatically line up with the left margin.
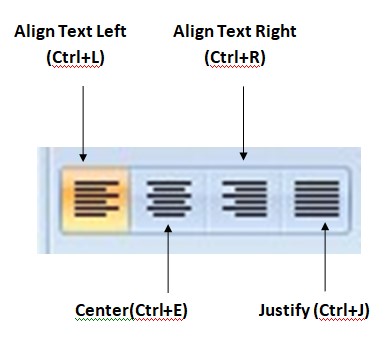
Right Alignment
यदि टेक्स्ट को दायी ओर (Right align) से मिलान करने की आवश्यकता है, तो माउस से टेक्स्ट का चयन करें और होम टैब पर align text Right बटन पर क्लिक करें। इसका Short cut key-Ctrl+R होता है.
If you need to Right align text, highlight the text with the mouse and click the Align Left button on the Home tab. (Short cut key-Ctrl+R)
Centre Alignment
यदि टेक्स्ट को केंद्र (Center align) से मिलान करने की आवश्यकता है, तो माउस से टेक्स्ट का चयन करें और होम टैब पर align Center बटन पर क्लिक करें। इसका Short cut key-Ctrl+E होता है
To center text, click the Center button. Your text is now lined up in the center of the page. (Short cut key-Ctrl+E)
Left Alignment
यदि टेक्स्ट को बायी ओर (Left align) से मिलान करने की आवश्यकता है, तो माउस से टेक्स्ट का चयन करें और होम टैब पर align text left बटन पर क्लिक करें। इसका Short cut key-Ctrl+L होता है
To move the text so it is aligned with the left margin, highlight the text you want to move, and click the Align Left button. Your text is now aligned to the Left margin. (Short cut key-Ctrl+L)
Justify Alignment
यदि टेक्स्ट या ग्राफिक्स को दोनों और से मिलान करना चाहते हैं तो टेक्सट का चयन कर होम टैब के पैराग्राफ ग्रुप पर जस्टिफाई (Justify) ऑप्शन पर क्लिक करें
If you want to Align the text or graphics with both sides, select Text and click on the Justify option on the paragraph group of the Home tab. (Short cut key-Ctrl+J)
Line Spacing
पैराग्राफ के पहले एवं पैराग्राफ के बाद स्पेस तथा दो लाइनों के बीच स्पेस को समायोजित करने के लिए पैराग्राफ dialog box के Spacing Group पर निम्न विकल्प होते है.
To adjust the space before and after the paragraph and the space between two lines, there are the following options on the Spacing Group of the Paragraph dialog box.
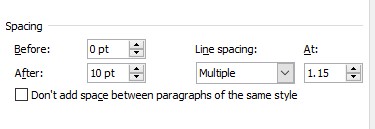
After
इस विकल्प का उपयोग पैराग्राफ के पहले स्पेस देने के लिए किया जाता है
This option is used to give space before the paragraph.
Before
इस विकल्प का उपयोग पैराग्राफ के बाद स्पेस देने के लिए किया जाता है
This option is used to give space after paragraph.
Spacing
इस विकल्प प्रयोग पैराग्राफ में दो लाइनों के बीच स्पेस को समायोजित करने के लिए किया जाता है
This option is used to adjust the space between two lines in a paragraph.
INDENT
एमएस वर्ड में टाइप किए गए प्रत्येक पैराग्राफ में First Line Indent एवं पैराग्राफ के अन्य लाइन पर भी Indent निर्धारित कर सकते हैं. Indention का अर्थ पेज पर मार्जिन से टेक्स्ट की दूरी होती है ना की पेज से टेक्स्ट की.
First Line Indent in each paragraph typed in MS Word and Indent can also be set on other lines of the paragraph. Indention means the distance of the text from the margin on the page and not the text from the page.
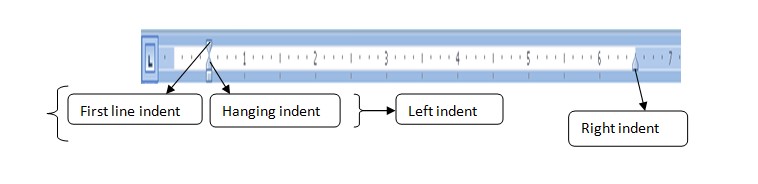
Indent दो प्रकार के होते है-
- Left Indent
- Right Indent
Click On The Home Tab
Click On the Paragraph Group Paragraph Dialog Box will be open.
Indention Group में निम्न विकल्प होते है
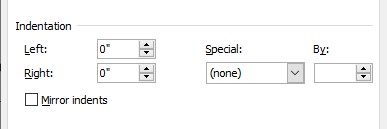
Left indent
इस Indent का प्रयोग पैराग्राफ को लेफ्ट मार्जिन से टेक्सट की दूरी निर्धारित करने के लिए किया जाता है. This Indent is used to set the distance of the text from the left margin of the paragraph.
Right Indent
इस Indent का प्रयोग पैराग्राफ को राइट मार्जिन से टेक्सट की दूरी निर्धारित करने के लिए किया जाता है. This Indent is used to set the distance of the text from the right margin of the paragraph.
Special
None
इस विकल्प को चयन करने पर पैराग्राफ के प्रथम लाइन एवं अन्य लाइन की दूरी मार्जिन से एक जैसी होती है. On selecting this option, the distance of the first line and other lines of the paragraph is the same from the margin.
First Line Indent
इस विकल्प को चयन करने पर पैराग्राफ के प्रथम लाइन की इंडेंट निर्धारित किया जा सकता है. Selecting this option can set the indent of the first line of a paragraph.
Hanging
इस विकल्प का चयन कर पैराग्राफ की अन्य लाइन की इंडेंट निर्धारित किया जा सकता है. The indent of other lines of a paragraph can be set by selecting this option.
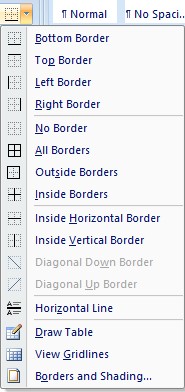
Paragraph Border
जिस पैराग्राफ में कर्सर स्थित है उस पैराग्राफ के चारों ओर बॉर्डर जोड़ने के लिए पैराग्राफ ग्रुप पर बॉर्डर बटन पर क्लिक करें. border-style को चेंज करने के लिए बॉर्डर ऑप्शन के ड्रॉपडाउन एरो पर क्लिक करें. पैराग्राफ से बॉर्डर को हटाने के लिए No Border विकल्प का चयन करें.
To add a border around the paragraph in which the cursor is located, on the Paragraph group, click the Border button. To change the border-style, click on the dropdown arrow of the border option. Select the No Border option to remove the border from the paragraph.
Shading
इस विकल्प का प्रयोग पैराग्राफ पर सेटिंग देने के लिए किया जाता है पैराग्राफ पर ट्रेडिंग देने के लिए होम टैब पर पैराग्राफ ग्रुप पर सेटिंग का ऑप्शन पर क्लिक करें पैराग्राफ की सेटिंग कलर को चेंज करने के लिए सेटिंग ऑप्शन के ड्रॉप डाउन एरो पर क्लिक करें.
This option is used to give setting on paragraph To give trading on paragraph click on setting option on Paragraph group on Home tab Click on drop down arrow of setting option to change setting color of paragraph.
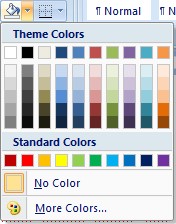
इस कलर बॉक्स पर कलर सेलेक्ट करें पैराग्राफ से सेटिंग रिमूव करने के लिए नौ कलर ऑप्शन पर क्लिक करें. Select the color on this color box. To remove the setting from the paragraph, click on the nine color option.
इन्हें भी देखें – एमएस ऑफिस बटन की सम्पूर्ण जानकारी
इन्हें भी देखें – नवीनतम सरकारी नौकरियां
इन्हें भी देखें – Photoshop 7.0 Image size resolution and mode
ये भी देखें – डाटा क्या है What is Data – Data Types, Number System, Fixed Point Representation
ये भी देखें – Job Alert in Hindi
यदि आपका कोंई विचार, सुझाव है तो हमें पोस्ट के निचे कमेंट सेक्शन में बेशक बताएं. जिससे हम वेबसाइट के कमियों को दूर करके और बेहतर बनाकर आपके सामने रख सकें. हमारे सभी पोस्ट को अपने दोस्तों के साथ शेयर करना न भूलें.