MS-Word 2007 Font Formatting एमएस वर्ड में Text Formatting वर्ड प्रोसेसर के कई Features में Text Editing करने की क्षमता महत्वपूर्ण Feature है जो वर्ड प्रोसेसर के महत्व को बढ़ाकर Powerful बनाता है.
MS-Word 2007 Font Formatting एमएस वर्ड 2007 फॉण्ट फोर्मटिंग
MS Word 2007 Text Formatting – एमएस वर्ड में Text Formatting वर्ड प्रोसेसर के कई Features में Text Editing करने की क्षमता महत्वपूर्ण Feature है जो वर्ड प्रोसेसर के महत्व को बढ़ाकर Powerful बनाता है. हम डॉक्यूमेंट को कई बार Revise कर सकते हैं इसके अतिरिक्त डॉक्यूमेंट में Font Style, Size, Color देकर इसे Effective ( आकर्षक) बना सकते हैं. एमएस वर्ड में Text को Format करने के लिए Text को Type करते हैं जब Text Type हो जाए तो जिस Text को हमें Format करना है उस टेक्स्ट को Mouse या Keyboard से चयन करने के बाद Font को Format करते हैं अर्थात Font को Effective बनाने के लिए इसे Bold, Italic व Underline किए जाते हैं.
The ability to do text editing is an important feature among many features of the word processor, which increases the importance of the word processor and makes it powerful. We can revise the document many times, apart from this we can make it effective (attractive) by giving Font Style, Size, Color to the document. To format the text in MS Word, we type the text when the text is typed, then after selecting the text that we want to format with the mouse or keyboard, we format the font, that is, to make the font effective. It is made Bold, Italic and Underline.
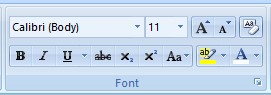
Text Formatting Option In MS Word
Font Style
यह Text के Font Style को Specify ( निर्दिष्ट) करता है Text Style को Change करने के लिए Text को Select कर Home Tab के Font Group पर Font Style Drop down Menu पर क्लिक कर Font Style चयन करे.
It specifies the font style of the text. To change the text style, select the text and click on the Font Style drop down menu on the Font Group of the Home tab and select Font Style.
Font Size
यह Font Size को Specify ( निर्दिष्ट )करता है अर्थात Font Size को Increase या Decrease करता है Font Size को Increase करने के लिए Text का चयन कर Home Tab के Font Group पर Font Size Drop down Menu पर क्लिक कर Font Size का चयन करे. Font Size को Increase करने के लिए Shortcut Key – Ctrl+Shift+> तथा Font Size को Decrease करने के लिए Shortcut Key – Ctrl+Shift+< होता है.
It Specifies the Font Size, that is, Increases or Decreases the Font Size. To increase the Font Size, select the text, select the Font Size by clicking on the Font Size drop down menu on the Font Group of the Home tab. Shortcut Key – Ctrl+Shift+> to Increase Font Size and Shortcut Key – Ctrl+Shift+< to Decrease Font Size.
Bold
इसका प्रयोग Text को Bold करने के लिए किया जाता है Text को Bold करने के लिए Text का चयन कर Font Group पर Bold ऑप्शन पर क्लिक करते हैं इसका Shortcut Key की Ctrl+B होता है.
It is used to make the text bold, to make the text bold, select the text and click on the bold option on the Font Group, its shortcut key is Ctrl + B.
Italic
इसका प्रयोग Text को Italic करने के लिए किया जाता है Text को Italic करने के लिए Text का चयन कर Font Group पर Italic ऑप्शन पर क्लिक करते हैं इसका Shortcut Key Ctrl+I होता है.
It is used to italicize the text, to italicize the text, select the text and click on the italic option on the font group, its shortcut key is Ctrl + I.
Underline
इसका प्रयोग Text को Underline करने के लिए किया जाता है Text को Underline करने के लिए Text का चयन कर Font Group पर Underline ऑप्शन पर क्लिक करते हैं इसका Shortcut Key की Ctrl+U होता है.
It is used to underline the text, to underline the text, select the text and click on the Underline option on the Font Group, its shortcut key is Ctrl + U.
Subscript [X2]
इस विकल्प का प्रयोग Text को Baseline से नीचे करने के लिए किया जाता है Text को Subscript बनाने के लिए Font Group में Subscript [X2] पर क्लिक करे. इसका शॉर्टकट की Ctrl+= होता है.
This option is used to make the text below the baseline, to make the text a subscript, click on Subscript [X2] in the Font Group. Its shortcut key is Ctrl+=.
Superscript[X2]
इस विकल्प का प्रयोग Text को Baseline से ऊपर करने के लिए किया जाता है Tex को Superscript बनाने के लिए Text का चयन कर Font Group में Superscript [X2] पर क्लिक करे. इसका शॉर्टकट की Ctrl+Shift+= होता है.
This option is used to make the text above the baseline, to make the text superscript, select the text and click on Superscript [X2] in the Font Group. Its shortcut key is Ctrl+Shift+=.
Change Case
इसका प्रयोग font को Upper Case, Lower Case, Sentance Case, Capitalize Each, tOGGLE cASE में Change करने के लिए किया जाता है अर्थात Font को बिना Edit किए Upper Case, Lower Case, Sentance Case, Capitalize Each, tOGGLE cASE में Change कर सकते है.
It is used to change the font to Upper Case, Lower Case, Sentance Case, Capitalize Each, tOGGLE cASE i.e. Change the font to Upper Case, Lower Case, Sentance Case, Capitalize Each, tOGGLE cASE without editing Is.
Text Highlight Color
इसका प्रयोग Font को Highlight करने के लिए किया जाता है. Font को Highlight करने के लिए Font को Select कर Text Highlight Color पर क्लिक करें.
It is used to highlight the font. To highlight the font, select the font and click on Text Highlight Color.
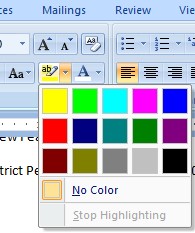
Text को highlight करने के लिए Color select करें. Text के highlight Color को हटाने के लिए highlight Text को Select कर No Color Option पर Click करें.
Select Color to highlight the text. To remove the highlight color of the text, select the highlight text and click on the No Color option.
Font Color
इसका प्रयोग Font को Color करने के लिए किया जाता है Font का कलर Black होता है Font को Color करने के लिए Font Color Drop Down Menu पर Click करने पर Color बॉक्स Display होता है.
It is used to color the font, the color of the font is black, to color the font, the color box is displayed when you click on the Font Color drop down menu.
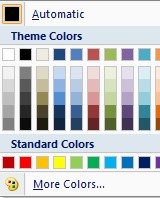
Color Box से चयन किए गए Text के लिए कलर Select करे. Select the color for the selected text from the Color Box.
Clear Formatting
इसका उपयोग Text पर Apply किये गए Formatting को Clear करने के लिए किया जाता है. Formatting को Clear करने के लिए Text को select कर clear formatting option पर click करते है.
It is used to clear the formatting applied on the text. To clear the formatting, select the text and click on the clear formatting option.
यदि आपका कोंई विचार, सुझाव है तो हमें पोस्ट के निचे कमेंट सेक्शन में बेशक बताएं. जिससे हम वेबसाइट के कमियों को दूर करके और बेहतर बनाकर आपके सामने रख सकें. हमारे सभी पोस्ट को अपने दोस्तों के साथ शेयर करना न भूलें.
महत्वपूर्ण लिंक
इन्हें भी देखें – एमएस ऑफिस बटन की सम्पूर्ण जानकारी
इन्हें भी देखें – नवीनतम सरकारी नौकरियां
इन्हें भी देखें – Photoshop 7.0 Image size resolution and mode
ये भी देखें – डाटा क्या है What is Data – Data Types, Number System, Fixed Point Representation
ये भी देखें – Job Alert in Hindi
पाठकों के लिए सन्देश
यदि आपका कोंई विचार, सुझाव है तो हमें पोस्ट के निचे कमेंट सेक्शन में बेशक बताएं. जिससे हम वेबसाइट के कमियों को दूर करके और बेहतर बनाकर आपके सामने रख सकें. हमारे सभी पोस्ट को अपने दोस्तों के साथ शेयर करना न भूलें.
हमारे टेलीग्राम ग्रुप से जुड़ें
Telegram Group Click Here
Recent Posts
- System Analysis in Software Engineering
- Computer Auxiliary Memory कंप्यूटर की सहायक मेमोरी Magnetic Drum, Magnetic Disk, Magnetic Tape
- Microsoft Publisher 2007 माइक्रोसॉफ्ट पब्लिशर 2007
- Insert Word Art in MS Word 2007| एम एस वर्ड में वर्ड आर्ट कैसे डालें ?
- MS Word 2007 Creating Chart in Word Documents वर्ड डॉक्यूमेंट में चार्ट कैसे बनायें
- MS Word 2007 Auto Text and Auto Correct एमएस वर्ड में ऑटो टेक्स्ट और ऑटो करेक्ट आप्शन क्या है