Complete information about MS Office Button इस पोस्ट के द्वारा एमएस ऑफिस बटन की सम्पूर्ण जानकारी प्राप्त कर सकते है.
एमएस ऑफिस बटन की सम्पूर्ण जानकारी Complete information about MS Office Button
एमएस ऑफिस बटन की सम्पूर्ण जानकारी
एमएस ऑफिस बटन की सम्पूर्ण जानकारी – ऑफिस बटन के द्वारा आप नया फाइल बनाना, ओपन करना, प्रिंट जैसे बहुत से काम आसानी से कर सकते है. इसके महत्वापूर्ण आप्शन निचे दिया गया है.
With the Office button, you can easily do many things like create, open, print a new file. Its important option is given below.
Office Button Options
New
इस विकल्प प्रयोग का नई फाइल क्रिएट करने के लिए किया जाता है इसका Short cut key Ctrl+N होता है.
This option is used to create a new file, its short cut key is Ctrl + N.

Open
इस विकल्प (Option) का प्रयोग एमएस वर्ड में पहले से बनी हुई फाइल (File) को Open करने के लिए किया जाता है इस विकल्प (option) पर क्लिक (Click) करने पर डायलॉग बॉक्स Dialog Box प्रदर्शित (Display) होता है.
This option is used to open the file already created in MS Word. On clicking this option, the dialog box is displayed.
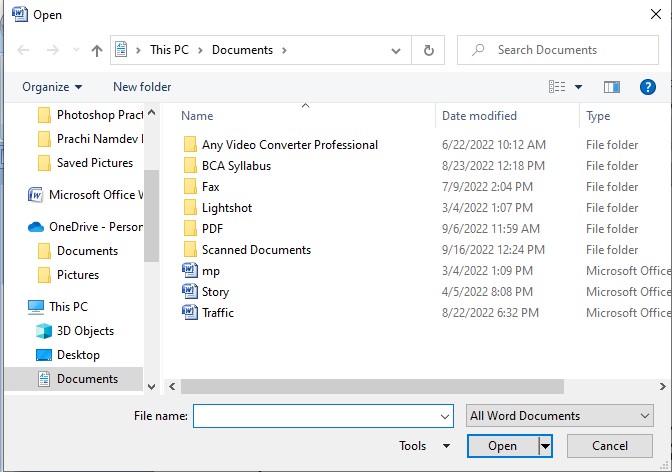
इस Open डायलॉग बॉक्स पर फाइल (File) सेलेक्ट कर Open बटन पर क्लिक करें.
Select the file on this Open dialog box and click on the Open button.
Save
इस विकल्प (Option) का प्रयोग File (Document) को सुरक्षित ( Save) करने के लिए किया जाता है Save ऑप्शन पर क्लिक करने पर Save As डायलॉग बॉक्स प्रदर्शित होता है.
This option is used to save the file (document), on clicking the Save option, the Save As dialog box is displayed.
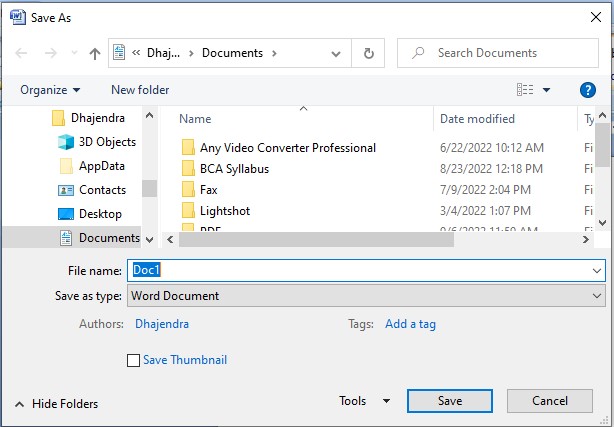
Save As डायलॉग बॉक्स पर File का Location Select कर (File Name) फाइल का नाम देकर Save बटन पर क्लिक करें.
On the Save As dialog box, select the location of the file (File Name) and click on the Save button by giving the name of the file.
एमएस वर्ड में फाइल का Extension . DOCX होता है, इसका shortcut Key की Ctrl+S है.
The extension of the file in MS Word is .DOCX. Its shortcut key is Ctrl+S.
Save-As
इस विकल्प (option) का प्रयोग पहले से बनी हुई फाइल ( जिसको एक बार पहले सेव किया जा चुका है ) उस फाइल को अन्य नाम से Save करने के लिए किया जाता है साथ ही फाइल को सेव करते समय इसका Location भी Change किया जा सकता है.
This option is used to save the already created file (which has been saved once) by another name, as well as its location can also be changed while saving the file.
उदाहरण :-
हम एक नया डॉक्यूमेंट Create किए और उसमें कुछ Information टाइप किए जैसे
We created a new document and typed some information in it like
Name – Akash
Address – Raipur
Date of Birth – 22/07/2005
अब इस फाइल के लिए Location Select कर File को Information नाम से सेव कर दिए। फाइल को सेव करने के बाद इस फाइल में कुछ इंफॉर्मेशन Add किए जैसे
Now after selecting the location for this file, save the file as Information. After saving the file, add some information to this file like
Name – Akash
Address – Raipur
Date of Birth – 22/07/2005
Dist – Raipur
State – (C.G.)
अब हम चाहते हैं कि इंफॉर्मेशन नाम का फाइल में कोई परिवर्तन ना हो और यह एक नया फाइल बन जाए तो हम Save As Option पर क्लिक करेंगे.
Now we want that there should be no change in the file named information and if it becomes a new file then we will click on Save As Option.
Save As Option पर क्लिक करने पर Save As डायलॉग बॉक्स पर अन्य फाइल का नाम एवं Location Select कर Save बटन पर क्लिक करेंगे.
On clicking the Save As option, you will select the name and location of the other file on the Save As dialog box and click on the Save button.
एमएस वर्ड में इस option का प्रयोग Create किए गए डॉक्यूमेंट को प्रिंट करने के लिए किया जाता है इसका Shortcut key Ctrl+P की होता है. Print Option पर क्लिक करने पर हमें Three Option दिखाई देते हैं. Print, Quick Print, Print Preview.
In MS Word, this option is used to print the created document, its shortcut key is Ctrl + P. On clicking on Print Option, we see three options. Print, Quick Print, Print Preview.
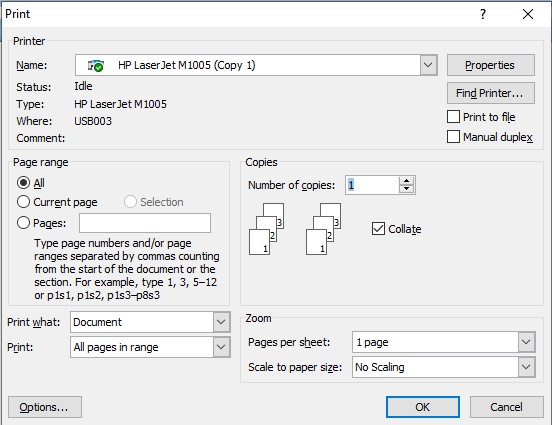
इस ऑप्शन पर क्लिक करने पर डॉक्यूमेंट को प्रिंट करने के लिए एक प्रिंट डायलॉग बॉक्स Display होता है print Dialog Box मे बहुत सारे ऑप्शन होते हैं.
On clicking this option, a print dialog box is displayed to print the document. There are many options in the print dialog box.
- Name:- इस विकल्प ( Option) पर हमें यह चयन (Select) करना होता है कि हमें डॉक्यूमेंट को कौन से प्रिंटर से प्रिंट निकालना है अर्थात कंप्यूटर पर जुड़े हुए प्रिंटर का नाम या मॉडल सेलेक्ट करते हैं. On this option we have to select from which printer we want to print the document i.e. select the name or model of the printer connected on the computer.
- Page Range:- इस पर तीन विकल्प होता है There are three options on this
- All:- इस रेडियो बटन (Radio Button) का चयन (Select) करने पर डॉक्यूमेंट के सभी पेज प्रिंट होते है. On selecting this radio button, all the pages of the document are printed.
- Current Page:- इस इस रेडियो बटन (Radio Button) का चयन (Select) करने पर डॉक्यूमेंट करने पर डॉक्यूमेंट का वह पेज प्रिंट होता है जो स्क्रीन पर दिख रहा होता है. On selecting this radio button, on documenting, that page of the document is printed which is visible on the screen.
- Pages:- इस इस रेडियो बटन (Radio Button) का चयन (Select) करने पर डॉक्यूमेंट का वह पेज को प्रिंट निकाल सकते हैं जिसका पेज संख्या ( page Number) Text Box दी गई होती है। Page Number को हम निम्न में प्रकार से दे सकते हैं जैसे 4. 4,5,7 6-10 6-10, 15-20 etc. On selecting this radio button, you can print that page of the document whose page number text box is given. We can give Page Number in the following way like 4. 4,5,7 6-10 6-10, 15-20 etc.
- Number of Copies:- यह दी गयी संख्या के अनुसार उतनी प्रतियां प्रिंट करता है। It prints as many copies as given number of times.
- Print:-
- All Pages in Range- इस Option को सेलेक्ट करने पर सभी पेज प्रिंट होता है. On selecting this option all the pages are printed.
- Odd Page- इस ऑप्शन को सिलेक्ट करने पर डॉक्यूमेंट के odd Page प्रिंट होते हैं. On selecting this option, odd pages of the document are printed.
- Even Page – इस ऑप्शन को सिलेक्ट करने पर डॉक्यूमेंट के Even Page प्रिंट होते हैं. On selecting this option, even pages of the document are printed.
- Pages Per Sheet:- इसमें By Default 1 Page होता है अगर हमें डॉक्यूमेंट के एक से अधिक पेज को एक पेज पर प्रिंट करना होता है तो हम इसमें डॉक्यूमेंट के 2 पेज, 4 पेज, 8 पेज को एक ही पेज में प्रिंट कर सकते हैं. It has By Default 1 Page, if we have to print more than one page of the document on one page, then we can print 2 pages, 4 pages, 8 pages of the document in a single page.
- Scale to Paper Size:- इसमें हमें पेपर का साइज चयन करना होता है जिसमें हम प्रिंट निकालना चाहते हैं इसमें हमें वह पेज चयन करना होता है जिसमें डॉक्यूमेंट क्रिएट किया है. In this, we have to select the size of the paper in which we want to print, in which we have to select the page in which the document is created.
सभी विकल्प का चयन करने के बाद ओके बटन पर क्लिक करें. After selecting all the options click on the OK button.
Print Preview
डॉक्यूमेंट को प्रिंट करने से पहले इसको स्क्रीन पर देखने की प्रक्रिया कहलाती है इसे डॉक्यूमेंट पेज पर प्रिंट के बाद कैसे लगेगी इसकी जानकारी मिलती है.
Before printing the document, the process of viewing it on the screen is called, it gets information about how it will look after print on the document page.
Quick print
इस Option का चयन करने से डॉक्यूमेंट कंप्यूटर पर By Default Select प्रिंटर पर प्रिंट हो जाता है.
Selecting this option prints the document on the computer by default selected printer.
महत्वपूर्ण लिंक
इन्हें भी देखें – नवीनतम सरकारी नौकरियां
इन्हें भी देखें – Photoshop 7.0 Image size resolution and mode
ये भी देखें – डाटा क्या है What is Data – Data Types, Number System, Fixed Point Representation
ये भी देखें – Job Alert in Hindi
यदि आपका कोंई विचार, सुझाव है तो हमें पोस्ट के निचे कमेंट सेक्शन में बेशक बताएं. जिससे हम वेबसाइट के कमियों को दूर करके और बेहतर बनाकर आपके सामने रख सकें. हमारे सभी पोस्ट को अपने दोस्तों के साथ शेयर करना न भूलें.
हमारे टेलीग्राम ग्रुप से जुड़ें
Telegram Group Click Here
- System Analysis in Software Engineering
- Computer Auxiliary Memory कंप्यूटर की सहायक मेमोरी Magnetic Drum, Magnetic Disk, Magnetic Tape
- Microsoft Publisher 2007 माइक्रोसॉफ्ट पब्लिशर 2007
- Insert Word Art in MS Word 2007| एम एस वर्ड में वर्ड आर्ट कैसे डालें ?
- MS Word 2007 Creating Chart in Word Documents वर्ड डॉक्यूमेंट में चार्ट कैसे बनायें
- MS Word 2007 Auto Text and Auto Correct एमएस वर्ड में ऑटो टेक्स्ट और ऑटो करेक्ट आप्शन क्या है
- MS Word 2007 Mail Merge मेल मर्ज क्या है
- MS Word 2007 Document Formatting एमएस वर्ड 2007 डॉक्यूमेंट फॉर्मेटिंग